linux下postfix+dovecot+foxmail邮件服务器搭建 |
您所在的位置:网站首页 › foxmail 服务器设置 › linux下postfix+dovecot+foxmail邮件服务器搭建 |
linux下postfix+dovecot+foxmail邮件服务器搭建
|
linux下postfix+dovecot+foxmail邮件服务器搭建
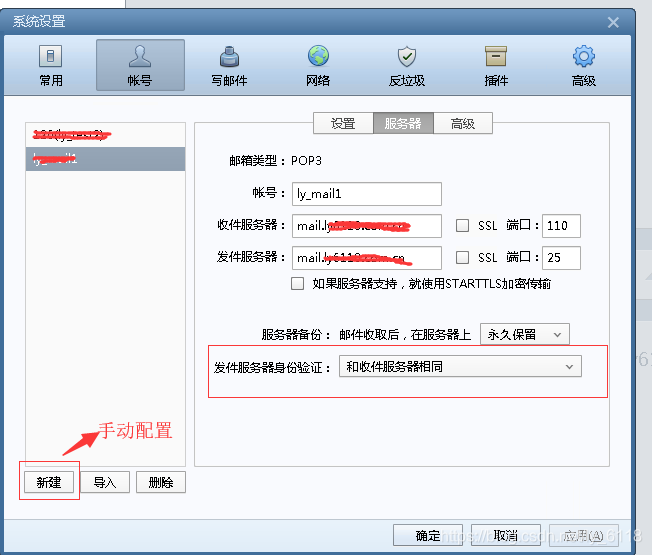
postfix配置和安装参考https://blog.csdn.net/ly_6118/article/details/89637270 这是之前用来测试垃圾邮件功能搭建的smtp服务器,后来在内网完整搭建了一个完整收发的邮件服务器 里面的postfix配置略有不同,因为在搭建dovecot的过程中发现无法收取邮件发现的问题,后来针对进行了修改。 DNS配置见https://blog.csdn.net/ly_6118/article/details/89637270 postfix配置vi /etc/postfix/main.cf 最终配置文件如下(所有注销的配置) queue_directory = /var/spool/postfix command_directory = /usr/sbin daemon_directory = /usr/libexec/postfix data_directory = /var/lib/postfix mail_owner = postfix myhostname = mail.jjonline.com.cn mydomain = jjonline.com.cn myorigin = $mydomain inet_interfaces = all inet_protocols = all mydestination = $myhostname, localhost.$mydomain, localhost, $mydomain #注意这条配置,由于之前是注销的上面一条mydestination = $myhostname, localhost.$mydomain, localhost #导致最后发送邮件时查看maillog报status=bounced (mail for jjonline.com.cn loops back to myself) #邮件回退给了自己,没有发送出去 unknown_local_recipient_reject_code = 550 mynetworks = 127.0.0.1, 10.0.0.0/8, 209.45.60.0/24 #这个信任域网段根据自己需求配置,最简单的就是配置0.0.0.0/0 所有网段都可以发送 alias_maps = hash:/etc/aliases alias_database = hash:/etc/aliases home_mailbox = Maildir/ smtpd_banner = $myhostname ESMTP $mail_name ($mail_version) broken_sasl_auth_clients = yes smtpd_client_restrictions = permit_sasl_authenticated smtpd_recipient_restrictions = permit_mynetworks, permit_sasl_authenticated, reject_unauth_destination smtpd_sasl_auth_enable = yes smtpd_sasl_security_options = noanonymous message_size_limit = 5242880 smtpd_relay_restrictions = permit_mynetworks,permit_sasl_authenticated,defer_unauth_destination smtpd_sasl_type = dovecot #增加了dovecot smtpd_sasl_path = private/auth debug_peer_level = 2 debugger_command = PATH=/bin:/usr/bin:/usr/local/bin:/usr/X11R6/bin ddd $daemon_directory/$process_name $process_id & sleep 5 sendmail_path = /usr/sbin/sendmail.postfix newaliases_path = /usr/bin/newaliases.postfix mailq_path = /usr/bin/mailq.postfix setgid_group = postdrop html_directory = no manpage_directory = /usr/share/man sample_directory = /usr/share/doc/postfix-2.10.1/samples readme_directory = /usr/share/doc/postfix-2.10.1/README_FILES cyrus-sasl安装与配置sasl主要用于邮箱用户名密码认证 参考来源:https://www.cnblogs.com/ilanni/p/5294611.html 作者:烂泥行天下 cyrus-sasl安装 cyrus-sasl的安装很简单,使用如下命令: yum -y install cyrus-sasl 查看版本cyrus-sasl,使用如下命令: /usr/sbin/saslauthd -v cyrus-sasl配置 修改saslauthd文件把MECH的值修改为shadow,如下: vi /etc/sysconfig/saslauthd SOCKETDIR=/run/saslauthd MECH=shadow FLAGS= 修改smtpd.conf文件,添加如下代码: vi /etc/sasl2/smtpd.conf pwcheck_method: saslauthd mech_list:plain login CRAM-MD5 DIGEST-MD5 log_level: 3 saslauthd_path:/var/run/saslauthd/mux 测试cyrus-sasl cyrus-sasl配置完毕后,我们来测试其是否正常。创建系统用户ilanni,并修改其密码,如下: useradd ilanni &&echo ‘ilannimail’| passwd --stdin ilanni su - ilanni mkdir -p ~/mail/.imap/INBOX #用户名 ilanni #密码 ilannimail 用户创建完毕后,要启动cyrus-sasl,如下: /etc/init.d/saslauthd start 或者 service saslauthd start #这个和linux版本有关,有的版本不支持第一条 chkconfig saslauthd on 现在来使用刚刚创建的用户进行认证测试,如下: testsaslauthd -u ilanni -p ‘ilannimail’ #会显示Success 测试postfix和用户名 telnet localhost 100 mail from:发件人邮箱或者 rcpt to:收件人邮箱或者 data 邮件内容 . quit #建立了新的用户会在home目录下产生对应用户名的文件夹 安装dovecot,使用如下命令: yum -y install dovecot dovecot-devel dovecot-mysql pam-devel dovecot --version 这里是2.2.36版本 dovecot的配置文件都在/etc/dovecot/目录下。 vi /etc/dovecot/dovecot.conf 主要配置如下 protocols = imap pop3 lmtp listen = , :: login_trusted_networks = 0.0.0.0/0 disable_plaintext_auth = no !include conf.d/.conf !include_try local.conf vi /etc/dovecot/conf.d/10-mail.conf mail_location = maildir:~/Maildir #有的配置文件里是注销mail_location = mbox:~/mail:INBOX=/var/mail/%u #这里试过注销INBOX这条,最后导致收件箱无法读取到文件 #telnet localhost pop3里敲list始终显示0message,最后发现是maildir路径错了 vi /etc/dovecot/conf.d/10-auth.conf disable_plaintext_auth = no auth_mechanisms = plain login !include auth-system.conf.ext 禁用ssl认证 vi /etc/dovecot/conf.d/10-ssl.conf ssl = no 启用dovecot的日志 vi /etc/dovecot/conf.d/10-logging.conf info_log_path = /var/log/dovecot_info.log debug_log_path = /var/log/dovecot_debug.log 启动dovecot service dovecot start chkconfig dovecot on 测试dovecot telnet mail.ilanni.com 110 telnet mail.ilanni.com 143 出现+Ok Dovecot ready,则表示dovecot配置正确。 这里需要注意的是收件箱登录的用户名不是完整的邮件名,是不带域名的 测试输入收件箱用户名密码输入list显示有收到三封邮件 retr 1 读取第一封邮件 这里能够收到就说明dovecot配置成功了 选择手动配置,这里配置的收件服务器和发件服务器是一个地址,就是mail.域名 选择pop3协议,imap比较复杂 需要注意的是收件服务器和发件服务器用户名的密码要一致 原来配置的时候没注意分别配置了不一样的密码,发邮件的时候需要重新验证密码,查看服务器上的日志一直报认证错误 修改smtp服务器密码 #创建smtp账号 saslpasswd2 -c -u postconf -h mydomain test #回车会要求输入密码,连续两次 #表示创建test@$mydomain的邮箱账号(也是smtp的账号)和密码 #本例就是创建[email protected]账号和密码 #此处注意的是smtp登录用的账号并不是单纯的用户名 而是整个邮箱地址字符串 |
 这里建了ly_mail1和ly_mail2用户 /home/ly_mail1/Maildir/new 在对应目录下能看到发送的邮件
  这个是用foxmail发件的内容
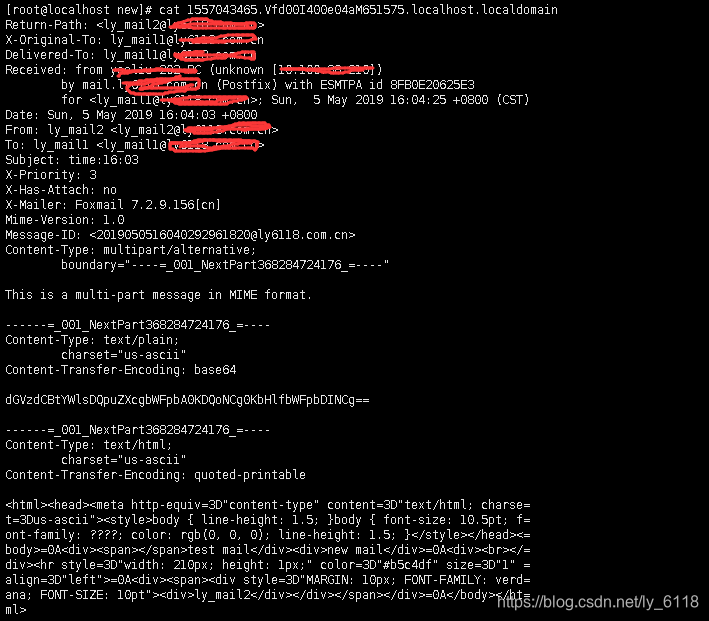
 dovecot基本配置
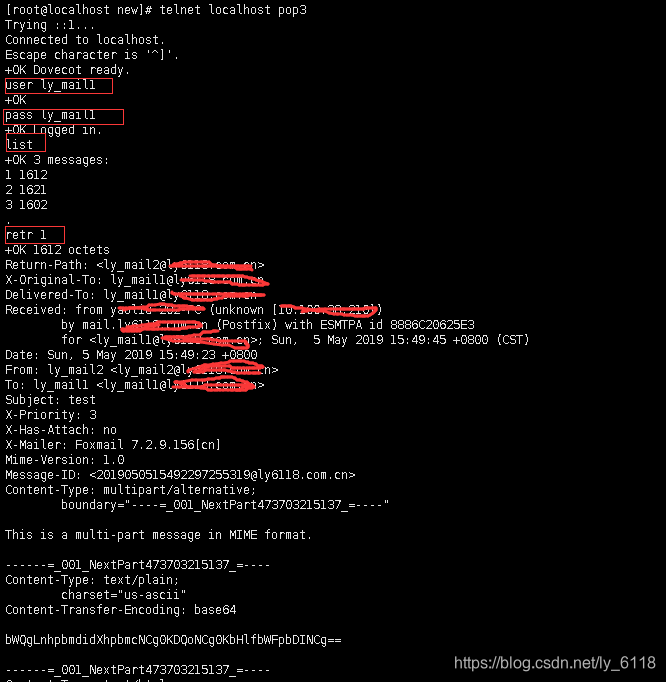
 点击收取就可以收到邮件了,这里的邮件就是从服务器/home/ly_mail1/Maildir/里读取
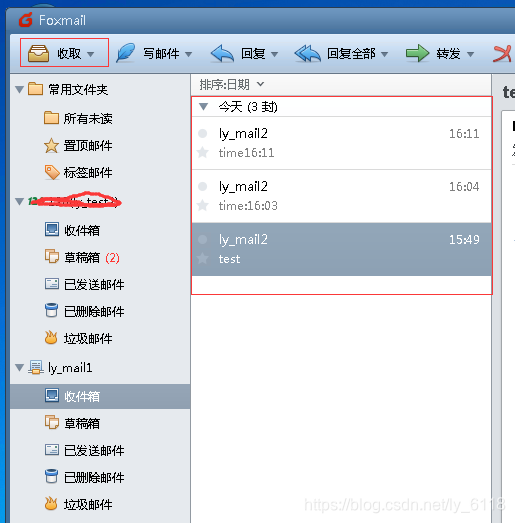
【本文地址】
今日新闻 |
推荐新闻 |